
Recording gameplay is different from recording a presentation. A game fills the screen with fast movement, detailed graphics and sound, and it is already using much of your computer's processor and graphics card before OBS even starts. That is why gameplay videos stutter, drop frames or look blurry when the settings are wrong, and why the same settings that work beautifully for a slide deck can fail completely in a fast game. OBS Studio handles gameplay recording well, and it is free and open-source, with no watermark and no time limit, but it needs to be set up for the job: the right capture source, a sensible resolution and frame rate, an encoder your machine can handle, and separate audio tracks so your voice and the game sound can be balanced later. This guide walks through all of that in order, from a fresh install to a finished clip you would be happy to upload.
Why OBS is a good choice for gameplay recording
OBS Studio is free and open-source software, released under the GPLv2 licence or later, and the latest version is 33.0.1, released on October 29, 2026. It runs on Windows 10 and 11, macOS 13.0 or newer, and Linux, where requirements vary by distribution. For gameplay, its main strengths are control and cost: you can capture a game, a webcam and a microphone together, mix them in real time, record locally at high quality, and stream the same scene live if you want to, all without paying for the software or accepting a watermark. Many built-in game recorders limit recording length, quality or file format, or stamp a logo on the video; OBS does none of that, and the files it produces are standard video files you can edit in any editor.
OBS also gives you options that matter specifically for games. Game Capture hooks into the game directly, which usually costs less performance than capturing the whole screen. Multiple audio tracks let you keep your microphone, the game sound and your voice chat on separate tracks, so a loud explosion or a friend shouting does not ruin your commentary in the edit. Scenes let you switch between full-screen gameplay, a face-camera view for introductions, and a "be right back" screen without stopping the recording. And because OBS records locally, you keep a high-quality master file even if you also stream, useful when a stream's quality is limited by your internet connection but your local recording is not.
Setting up before your first capture
Install OBS Studio 33.0.1 from an official source before you do anything else. The download links on this site point directly to official OBS Project files: the Windows x64 installer is the usual choice for Windows users, while macOS users pick the Apple Silicon or Intel disk image for their Mac. If you have not installed it yet, the download guide for Windows and the Windows 11 installation guide cover the process step by step. After installing, run the Auto-Configuration Wizard from the Tools menu, choose recording as your main use, and let it test your hardware. The wizard's suggestions are starting points, but they are based on your actual machine, which is a better basis than copying a stranger's settings.
Next, prepare the game itself. Launch the game first and set it to the display mode you plan to record, full-screen, borderless window or windowed, because the capture source you choose depends on it, and changing modes mid-session can break the capture. A borderless window is often the most flexible choice for recording, because it lets you switch to OBS without minimising the game. Lower the game's graphics settings slightly for your first test if your computer is modest; you can raise them later once you know the recording is smooth. Close unnecessary programs, especially browsers with many tabs, because they compete for the same memory and processor. And check your disk space: gameplay recordings at high quality can grow by several gigabytes per hour, and a full disk can stop a recording mid-game.
Using Game Capture, the right source for games
Game Capture is the source built for this job. It hooks into a running game and captures only that game's picture, even if other windows sit on top of it, and it usually costs less performance than capturing the whole display. To add it, select your "Gameplay" scene, click the plus button under Sources, choose Game Capture, and give it a name such as the game's title. In the properties window, the Mode setting offers two useful choices: "Capture any fullscreen application" automatically captures whichever full-screen game is running, which is convenient if you play several games, while "Capture specific window" lets you pick one game from a list, which is better when you always record the same title or when another full-screen program might confuse the automatic mode.
After choosing the mode, look at the preview. If the game is running, its picture should appear in OBS. If the preview stays black, do not panic, first check that the game is actually running and in the mode you selected, then try switching the mode between automatic and specific window. Some games need to be running before you add the source, so add the source after launching the game if it is blank. Also check the source properties for options such as capturing the mouse cursor and forcing the capture to a particular graphics setting; the defaults are usually fine, and you should only change them if the default does not work. A useful habit is to leave the game running in the background while you adjust OBS, so the preview updates live and you can see immediately whether a change helped.
When to use Window or Display Capture instead
Window Capture records one application window, and Display Capture records a whole monitor. Both are good fallbacks when Game Capture does not work, and each has situations where it is actually the better choice. Window Capture is useful for games that run in a window, for browser games, and for recording a game launcher or a companion app alongside the game. It shows only that window, so notifications and other programs stay out of the video, which protects your privacy. To add it, choose Window Capture from the Sources panel, pick the game window from the list, and keep the window open and not minimised while you record, a minimised window may not capture. If the picture is black, try a different capture method in the source properties.
Recording settings for smooth gameplay
Smooth gameplay recording is a balance between picture quality and the load on your computer, and the game itself is already using much of that load. Start with the resolution: your Base Resolution should match your monitor, and the Output Resolution is the size of the saved video. Recording a 1080p game at 1080p keeps the picture sharp, but if the recording stutters, dropping the output to 720p is the single most effective fix, and the difference is smaller than most people expect once the video is uploaded. Frame rate matters more for games than for presentations: 60 frames per second makes fast movement look smooth, while 30 frames per second can look choppy in a fast game. If your machine struggles at 60, try 30 before lowering anything else, and test in the actual game, because a calm menu screen tells you nothing about a busy fight.
Adding webcam, microphone and game audio
Most gameplay videos are better with a face and a voice. To add a webcam, click the plus button under Sources, choose Video Capture Device, select your camera, and shrink the picture in the preview by dragging its red corners, then drag it into a corner that does not cover important game information such as health bars, maps or ammo counts. The webcam source must sit above the game capture in the Sources list, because higher in the list means in front. Keep the webcam reasonably small, a corner picture is a complement to the game, not the main event, and check that it does not cover subtitles or objectives. Our guide to recording webcam with OBS covers camera framing, resolution and lighting in more detail.
Reviewing, clipping and managing your footage
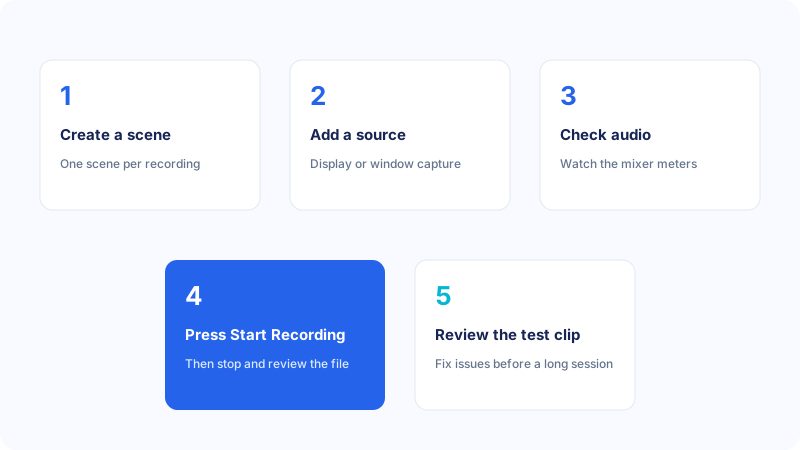
When you click Stop Recording, OBS saves the file to the Recording Path in Settings, then Output. Open it from the File menu with Show Recordings, and watch the first minute, a busy middle section and the end. Check four things: the game picture is sharp and fills the frame, the motion is smooth without stuttering, your voice is clear and louder than the game, and the video and audio stay in sync. If anything fails, fix that one thing, resolution, encoder, audio level, and record another short test before a long session. A five-minute test is cheap; discovering a problem after two hours of play is not.
Common mistakes
The most common gameplay-recording mistake is copying a popular creator's settings exactly. Their hardware, encoder and game are different, so settings that are smooth for them can overload your machine. Start with the Auto-Configuration Wizard, test in your actual game, and adjust one setting at a time. The second mistake is recording at the highest resolution and frame rate available and then wondering why the game stutters, a stable 1080p at 60 frames per second, or even 720p, beats a stuttering higher setting. Third, capturing with Display Capture when Game Capture would have worked, which costs performance and shows notifications. Fourth, recording the microphone twice, once as a source and once in Settings, which creates an echo. Fifth, letting game audio drown out commentary, because the mixer was never checked. Sixth, recording in MP4 and losing the file to a crash; use MKV while learning. And seventh, forgetting to check disk space before a long session, OBS stops when the disk is full, and the moment it stops is usually the best part of the game.
Troubleshooting
If the Game Capture preview is black, check that the game is running and in full-screen or borderless mode, try switching the capture mode between automatic and specific window, and make sure the game was launched before you added the source. If a particular game never appears, it may use anti-cheat software that blocks capture, in which case try Window Capture or Display Capture. If the recording stutters, lower the output resolution first, then the frame rate, then the game's graphics settings, and close heavy background programs; the Stats window under View shows encoding overload and dropped frames. If the game itself slows down while OBS records, the recording load is too high for your machine, hardware encoding, a lower resolution or a lower frame rate are the usual fixes, and our guide to fixing OBS recording problems covers the steps in order.
Frequently asked questions
Does recording gameplay with OBS lower my frame rate?
Recording uses some of your computer's resources, so it can lower the game's frame rate, especially on a modest machine. Using hardware encoding, recording at a resolution your machine can sustain, and lowering the game's graphics settings all reduce the impact. Test with a short recording in a busy part of the game to see the real effect on your system.
Should I use Game Capture or Display Capture for games?
Use Game Capture first: it hooks into the game directly, usually costs less performance, and captures only the game. Use Window Capture for windowed or browser games, and Display Capture when Game Capture does not work, for example with games whose anti-cheat software blocks it, or when you want to show the whole desktop.
What resolution and frame rate should I record gameplay at?
A good starting point is 1080p at 60 frames per second if your machine handles it smoothly, or 1080p at 30 frames per second for slower games. If the recording stutters, drop to 720p before changing anything else. The right choice depends on your hardware, your encoder and the game, so test in the actual game rather than copying someone else's numbers.
Can I record gameplay and my webcam at the same time?
Yes. Add a Game Capture source for the game and a Video Capture Device for the webcam in the same scene, shrink the webcam and place it in a corner that does not cover important game information, and make sure the webcam is above the game capture in the Sources list so it appears in front.
Why is my gameplay recording black?
A black Game Capture usually means the game was not running when the source was added, the game is in a display mode the source does not expect, or the game's anti-cheat software blocks capture. Launch the game first, try the other capture mode in the source properties, and fall back to Window Capture or Display Capture if the game blocks Game Capture.
Conclusion
Recording gameplay with OBS is a short routine once the setup is done: launch the game, add a Game Capture source to a dedicated scene, place your webcam where it does not hide important information, balance your voice against the game sound, and record a one-minute test in a busy part of the game before the real session. Keep the resolution and frame rate at levels your machine sustains, record in MKV while you are learning, and keep your microphone and game audio on separate tracks so the edit is easy. The first recordings will need adjustment, that is normal, and it is why the test matters. Once a clean, smooth recording feels routine, the same setup works for every game you play, and you can spend your time on the content instead of the settings.