Screen recording is the most common reason people install OBS Studio, and it is also one of the easiest things the program does well. Whether you are explaining a piece of software, teaching a lesson, recording a presentation, or saving a demonstration for later, OBS captures exactly what appears on your monitor, with your voice, and optionally your webcam, and saves it as a video file you can edit or upload. Unlike many screen recorders, OBS is free and open-source, puts no watermark on your video, and imposes no time limit, so a ten-minute tutorial and a two-hour workshop are recorded the same way. This guide covers the full process from a fresh install to a finished file: choosing between capturing a whole display or a single window, setting a sensible quality level, adding audio and a webcam, and finding your recording when you stop.
What screen recording with OBS can do
OBS Studio records your screen by capturing a source, usually a display or a window, and combining it with any audio and camera sources you add. The result is a standard video file saved on your computer. Because OBS is a general-purpose capture tool rather than a narrow screen recorder, you get more control than most simple recorders offer: you can record one monitor while working on another, show a webcam picture-in-picture in a corner, mix microphone and system audio on separate tracks, and switch between scenes mid-recording, for example, from a full-screen demonstration to a title slide. That flexibility is why teachers, software trainers, support teams and YouTubers all use the same program for very different videos.
Typical screen-recording uses include software tutorials, where you narrate while clicking through an application; online lessons, where a teacher records a screen with voiceover for students to watch later; product demonstrations and bug reports, where showing the exact steps matters more than describing them; presentations, where slides and a speaker's face appear together; and gameplay-adjacent content such as strategy guides that are not captured with Game Capture. OBS handles all of these with the same basic workflow, and the skills transfer directly to live streaming, which uses the same scenes and sources. If you are completely new to the program, our beginner guide on how to use OBS Studio explains scenes, sources and the interface first, and it pairs well with this guide.
Before you start: install and basic setup
Before recording anything, install OBS Studio 33.0.1, released on October 29, 2026, from an official source. The download links on this site point directly to official OBS Project files. On Windows, most users need the x64 installer; on macOS, choose the Apple Silicon or Intel disk image to match your Mac; on Linux, use the package for your distribution, such as the Ubuntu 26.04.deb. OBS Studio is free and open-source software under the GPLv2 licence or later, and it runs on Windows 10 and 11, macOS 13.0 or newer, and Linux, where requirements vary by distribution. If you have not installed it yet, follow the download guide for Windows or the Windows 11 installation guide.
When you first launch OBS, run the Auto-Configuration Wizard from the Tools menu if it does not appear automatically. Tell it you mainly want to record, and let it test your hardware and suggest settings. The wizard's suggestions are starting points, not rules, but they save you from guessing at encoder and resolution values on your first day. Next, tidy the desktop you are about to record: close private tabs, messages and unrelated applications, silence notifications, and put the application you will demonstrate front and centre. Viewers notice a cluttered desktop more than creators expect, and a notification popping up mid-recording can leak private information that cannot be removed from the video afterwards.
Adding a Display Capture source
Display Capture records everything on one monitor, and it is the simplest way to record your screen. It is the right choice when you will switch between several applications during the recording, for example, moving from a browser to a spreadsheet to a code editor, because the viewer simply sees whatever you do. To add it, create or select a scene in the Scenes panel, click the plus button under Sources, choose Display Capture, give it a name such as "Main Screen", and select the monitor you want to capture if you have more than one. A small properties window lets you choose the display and decide whether the mouse cursor should be visible; showing the cursor is usually helpful in tutorials, because viewers follow it to see what you are pointing at.
After adding the source, check the preview. The whole monitor should fill the preview exactly, edge to edge, with no black bars. If the picture is smaller than the preview or offset, right-click the source and choose Transform, then Fit to Screen. If you have two monitors, confirm you captured the right one: the preview shows the captured monitor, so look for the application you expect to see. A common surprise is capturing a secondary monitor that only shows a wallpaper, while the work happens on the primary display. If that happens, open the source properties and change the display. Also check that the capture includes the cursor if you want it, and that nothing private is visible, Display Capture shows everything, including desktop icons, the taskbar and notifications, so a quick tidy-up before recording is part of the job.
Recording a single window instead
Window Capture records one application window and nothing else, which makes it the tidier choice for many tutorials. The viewer sees only that window, even if you click elsewhere, open a private message, or get a notification on another part of the screen. That privacy benefit alone makes Window Capture worth learning. To add it, click the plus button under Sources, choose Window Capture, name it after the application, for example "Browser, Tutorial", and select the window from the list in the properties window. The list shows open windows by title, so open the application first and give it a recognisable title if you can. If the window is minimised, OBS may not be able to capture it, so keep it open and visible while you record.
Window Capture behaves slightly differently from Display Capture in a few situations. If the application window is resized during the recording, the captured picture resizes with it, which can look odd; it is better to set the window size before you start and leave it alone. Some applications, especially games and hardware-accelerated programs, do not work well with Window Capture and are better captured with Game Capture or Display Capture, see our guide to recording gameplay with OBS for that case. If a window shows a blank or black picture in OBS, try changing the capture method in the source properties: the Window Capture properties offer more than one capture method, and the right one depends on the application and your system.
Choosing recording format and quality
Recording quality in OBS is controlled mainly by three settings: resolution, frame rate and encoder, plus the recording format. Resolution is the size of the video picture. Your Base Resolution should match your monitor, and the Output Resolution is the size of the saved file, recording a 1920×1080 screen at 1280×720 produces a smaller, smoother file that still looks good for tutorials, while recording at full 1080p keeps text sharper. For most screen recordings, where the picture is mostly static text and windows, 1080p at 30 frames per second is a sensible starting point. Fast-moving content benefits from 60 frames per second, but it also produces larger files and needs more processing power, so only raise the frame rate if the content genuinely moves fast.
Adding a webcam overlay and audio
A webcam overlay puts your face in a corner of the screen recording, which makes tutorials feel more personal and helps viewers trust the presenter. To add one, click the plus button under Sources and choose Video Capture Device, select your webcam, and confirm the properties. The camera appears in the preview, usually filling the whole frame, so drag its red corners to shrink it and drag it into a corner that does not cover important content, the bottom right is a common choice, but move it if that corner holds buttons or text you need to show. Make sure the webcam source sits above the Display or Window Capture in the Sources list, because sources higher in the list appear in front of those below them; if the webcam is below the screen capture, it will be hidden behind it.
Finding, playing and sharing your recordings
When you click Stop Recording, OBS finishes writing the file to the Recording Path set in Settings, then Output. The fastest way to find it is the File menu, then Show Recordings, which opens the folder directly. The file name includes the date and time by default, which makes it easy to identify the latest take. Before you share or upload anything, open the file in a video player and watch at least the beginning, the middle and the end. Check that the right window was captured, that text is readable, that your voice is clear and in sync with the picture, and that the recording does not end abruptly. A quick review now is far cheaper than discovering a problem after you have uploaded or sent the file.
Common mistakes
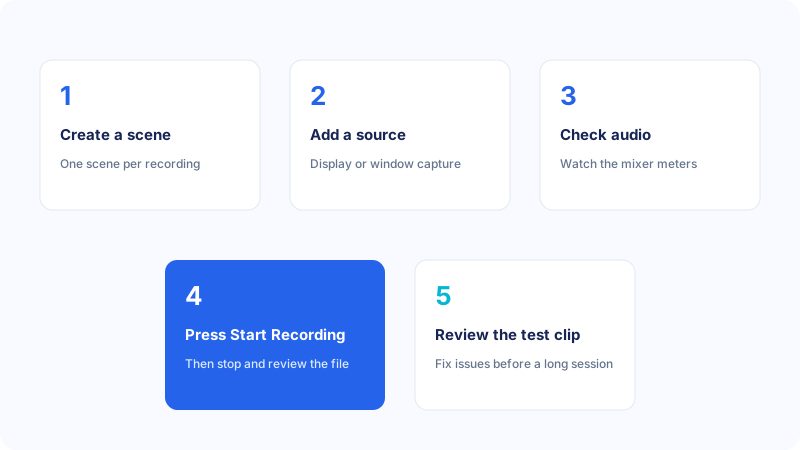
The most common screen-recording mistake is capturing the wrong thing: the wrong monitor on a multi-monitor setup, the wrong window, or a window that was minimised when recording started. Always check the preview and record a short test. The second is recording with no audio, usually because the microphone was muted in the mixer or the wrong device was selected in Settings; speak a test sentence and watch the meter before every session. Third, many beginners record everything at the highest possible resolution and frame rate, then wonder why the video stutters or the file is enormous, for a mostly static screen, 1080p at 30 frames per second is usually plenty, and higher settings should be earned by testing, not assumed. Fourth, forgetting to silence notifications and close private tabs, so a message preview or an email subject appears in the finished video. Fifth, recording in MP4 and losing the file to a crash; use MKV while learning. Finally, many people record a full hour before watching any of it back. Record a minute, review it, fix what is wrong, and only then commit to the long session.
Troubleshooting
If the preview is black, check the source first: is it hidden with the eye icon, is it capturing the right monitor or window, and is the window open and not minimised? On Windows, a black Display Capture is often a graphics setting issue on laptops with two graphics processors, and the recording-problems guide linked earlier walks through the fix. If the recording is silent, check the mixer, is the microphone meter moving, is the track muted, and is the correct device chosen in Settings, then Audio? If the video stutters, lower the output resolution or frame rate, close heavy applications, and check the Stats window under View for encoding overload or dropped frames. If the audio and video drift out of sync, the cause is often a heavy system load or a mismatched sample rate; reducing the load and keeping the sample rate at 48 kHz usually helps.
Frequently asked questions
Can OBS record my screen for free?
Yes. OBS Studio is free and open-source software, released under the GPLv2 licence or later. There is no time limit, no watermark and no paid version. You can record your screen as often and for as long as you like, and the files belong to you.
Should I use Display Capture or Window Capture?
Use Display Capture when you will switch between several applications during the recording, because it shows everything on the monitor. Use Window Capture when you want to show only one application and keep the rest of your screen private. Both are added from the Sources panel, and you can use different scenes for each.
What format should I record in, MP4 or MKV?
While you are learning, MKV is the safer choice, because a recording interrupted by a crash usually survives in MKV but is often unplayable in MP4. You can convert MKV to MP4 afterwards in OBS from the File menu, using Remux Recordings, without losing quality. If your editor requires MP4, remux before editing.
Why is my screen recording laggy or stuttering?
Stuttering usually means the computer cannot keep up with the chosen settings. Lower the output resolution or frame rate, close heavy applications, and check the Stats window for encoding overload. For a mostly static screen, 1080p at 30 frames per second is a good starting point, and results depend on your hardware and encoder.
Where does OBS save screen recordings?
OBS saves recordings to the Recording Path in Settings, then Output. You can open that folder quickly from the File menu by choosing Show Recordings. If you change the path, make sure the folder exists and the drive has enough free space before you start a long recording.
Conclusion
Recording your screen with OBS comes down to a short, repeatable routine: decide what the viewer should see, capture it with Display Capture or Window Capture, add your voice and optionally your webcam, check the preview and the audio meters, and record a short test before the real session. Choose a sensible resolution and frame rate, record in MKV while you are learning, and keep your recordings organised so you can find them later. The first few recordings will feel slow as you learn where each setting lives, but the workflow quickly becomes automatic, and the same scenes and habits carry straight over to streaming and to more advanced setups. Make the test recording, watch it back, fix one thing, and go again, that loop is how good screen recordings are made.